Usage
This article is a tutorial for nider package and at the same time it is a full reference of all nider models and possibilities.
Image units
There are three main units each nider.Image can consist of:
- header
- paragraph
- linkback
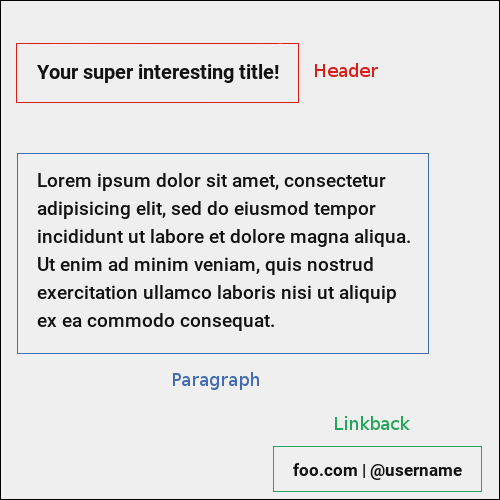
Each of the units is represented by a class in nider.models:
nider.models.Headernider.models.Paragraphnider.models.Linkback
nider.models.Header
Example
from nider.core import Font
from nider.core import Outline

from nider.models import Header


header = Header(text='Your super interesting title!',
                font=Font('/home/me/.local/share/fonts/Roboto/Roboto-Bold.ttf', 30),
                text_width=40,
                align='left',
                color='#ededed',
                outline=Oultine(2, '#222')
                )
nider.models.Paragraph
This class has the same attribures and behaviour as nider.models.Header.
Example
from nider.core import Font
from nider.core import Outline

from nider.models import Paragraph


para = Paragraph(text='Lorem ipsum dolor sit amet, consectetur adipisicing elit, sed do eiusmod tempor incididunt ut labore et dolore magna aliqua. Ut enim ad minim veniam, quis nostrud exercitation ullamco laboris nisi ut aliquip ex ea commodo consequat. Duis aute irure dolor in reprehenderit in voluptate velit esse cillum dolore eu fugiat nulla pariatur.',
                 font=Font('/home/me/.local/share/fonts/Roboto/Roboto-Bold.ttf', 30),
                 text_width=65,
                 align='left',
                 color='#ededed'
                 outline=Oultine(1, '#000')
                 )
nider.models.Linkback
Example
from nider.core import Font
from nider.core import Outline

from nider.models import Linkback


linkback = Linkback(text='foo.com | @username',
                    font=Font('/home/me/.local/share/fonts/Roboto/Roboto-Bold.ttf', 30),
                    color='#ededed',
                    outline=Oultine(2, '#000')
                    )
Note
Parameters color and outline.color are optional for any unit. They can be generated automatically by nider. nider analyzes background color of either a texture or of an image and chooses an opposite one to it. So if your image in mainly dark , white text color will be auto generated and set. The same applies to outline color.
Although it’s a nice feature for backgrounds you have no control over, we’d recommend to provide colors explicitly.
Image content
In order to aggregate all of the units together you need to create an instance of nider.models.Content class.
Initializing an image
After the content is prepared it’s the right time to initialize an image. In nider a basic image is represented by nider.models.Image.
Drawing on the image
Having an instance of nider.models.Image we are ready to create a real image.
nider comes with 3 options of drawing your image:
Image.draw_on_texture- draws preinitialized image and its attributes on a texture.Note
You don’t need to create textured images by pasting texture mulpitle times in Photoshop or Gimp.
nidertakes care of filling image of any size with textrure you privide.
Image.draw_on_bg- Draws preinitialized image and its attributes on a colored background. nider uses a color you provide to fill the image and then draws the content.Image.draw_on_image- Draws preinitialized image and its attributes on an image. Content will be drawn directly on the image you provide.
Image.draw_on_texture
Example
from nider.models import Content
from nider.models import Image


content = Content(...)

img = Image(content,
            fullpath='example.png',
            width=500,
            height=500
            )
img.draw_on_texture('example_texture.png')
Check the full example here .
nider comes with a huge bundle of textures. As for now you need to copy them to your machine if you want to use any of them.
Image.draw_on_bg
Image.draw_on_image
Examples
from nider.models import Content
from nider.models import Image


content = Content(...)

img = Image(content,
            fullpath='example.png',
            width=500,
            height=500
            )

img.draw_on_image('example_bg.jpg')
Using filters and enhancements:
img.draw_on_image('example_bg.jpg',
                  image_enhancements=((ImageEnhance.Contrast, 0.75),
                                     (ImageEnhance.Brightness, 0.5)),
                  image_filters=((ImageFilter.BLUR),),
                  )
Check the full example here .
That’s it. After any of draw methods has been called and successfully completed the new image will be saved to Image.fullpath.
Adding watermarks
nider comes with built-in support for adding watermarks to your images.
First of all you need to create an instanse of nider.models.Watermark class.
Example
watermark = Watermark(text='COPYRIGHT',
                      font=Font('/home/me/.local/share/fonts/Roboto/Roboto-Bold.ttf'),
                      color='#111',
                      cross=True,
                      rotate_angle=-45,
                      opacity=0.35
                      )
After this you can either add watermark to you Content instance and draw watermark on nider generated images:
from nider.models import Content
from nider.models import Image
from nider.models import Watermark


watermark = Watermark(...)

content = Content(..., watermark=watermark)

img = Image(content,
            fullpath='example.png',
            width=500,
            height=500
            )

img.draw_on_bg('#efefef')
or you can add a watermark to an existing image using nider.tools.add_watermark():
Example
from nider.models import Watermark

from nider.tools import add_watermark


watermark = Watermark(...)
add_watermark('path/to/my/img', watermark)
Social media images
nidercomes with some pre-built models that can be used to generate images for some social networks. These are subclasses ofnider.models.Imagewith changed size.Instagram
Facebook
Twitter
I highly recommend reading this post if you are curious about what are the right image sizes for social media images.